MSP global settings feature guide
This article walks you through the following sections:
The MSP Settings page hosts settings of various types that can be managed and configured for MSP end customers (organizations) from a central location. This reduces the overhead of MSP admins configuring different settings for each of their organizations individually. MSPs can configure these settings to their liking and apply them to all their organizations or a subset of their organizations with just a few clicks.
This page offers the following capabilities:
- MSPs can apply their brand to Graphus customer-facing reports and EmployeeShield® (warning banner on emails).
- MSPs can whitelist their trusted domains, mail-from domains, and IP addresses so that Graphus does not flag emails having these attributes. It helps with false positives reduction.
- MSPs can apply or not apply EmployeeShield® to emails from unverified senders. These are additional EmployeeShield® applications that MSPs can enable aside from the Quarantine and various other types of EmployeeShield® capabilities that Graphus offers by default.
Every section of the Global Settings page has three standard buttons: Save as Default, Apply, and Save as Default and Apply.
These buttons work in the following way:
- Save as Default: This creates a default setting that will be applied when a future organization is created.
- Apply: This button is independent of the Save as Default button and applies the setting to existing organizations that you select.
- Save as Default and Apply: This button gives you the combined capability of the Save as Default and Apply buttons. It will save the default settings at the MSP level and allow you to apply or propagate the selected features to single or multiple organizations. Any future organizations onboarding on the Graphus platform will inherit these settings by default.
Here are some example scenarios of how you can use these buttons:
- Existing Graphus MSP protecting organizations and configuring settings for the first time. You have two options:
- Save as Default: Configure and save the settings by clicking the Save as Default button. This will save the settings but will not apply them to any of your existing organizations. You can return to the settings page later and apply these settings to your existing organizations by clicking the Apply button. You will have the option of choosing a subset or all of your organizations. Save as Default will, however, apply these settings automatically to any new organizations onboarding on Graphus in the future.
- Save as Default and Apply: Configure the settings, save them as default, and apply them to your organizations by clicking Save as Default and Apply. You will have the option of choosing a subset or all of your organizations. These settings will automatically apply to any new organization onboarding on Graphus in the future.
- New Graphus MSP with no organizations under protection and configuring settings for the first time. You can only save the settings by clicking Save as Default. Since you have no organizations under protection, the Apply button is irrelevant. Save as Default will, however, apply these settings automatically to any new organizations onboarding on Graphus in the future.
- Existing Graphus MSP is protecting organizations, has configured settings in the past, and is making changes now. You have two options:
- Save as Default: Once changes have been made, you can save the settings by clicking Save as Default. The modified settings will NOT apply to any of your existing organizations, and they will continue using the old settings. You can return to the settings page later and apply the modified settings to your existing organizations by clicking the Apply button. However, Save as Default will automatically apply the updated settings to any future new organizations signing up for Graphus.
- Save as Default and Apply: After making changes, you can save them as defaults and apply them to your organizations by clicking Save as Default and Apply. You will have the option of choosing a subset or all of your organizations. The modified settings will also apply to any new organization onboarding on Graphus in the future.
The following sections cover the various settings available on the MSP Settings page.
In the MSP Branding section, you can apply your brand logo and colors to Graphus daily and monthly reports. If desired, MSPs can continue using the default Graphus logo and colors.
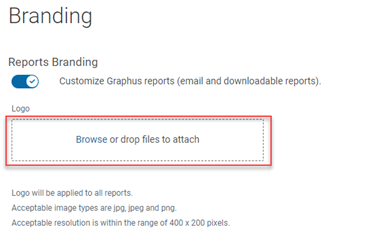
Logo
Logo Preview shows the default Graphus logo. You can add your logo by putting the file in the Logo field. The image file should be in JPG, JPEG, PNG, or GIF format. The image resolution should be within 400 x 200. As soon you upload the logo, you can preview the logo on the right side. 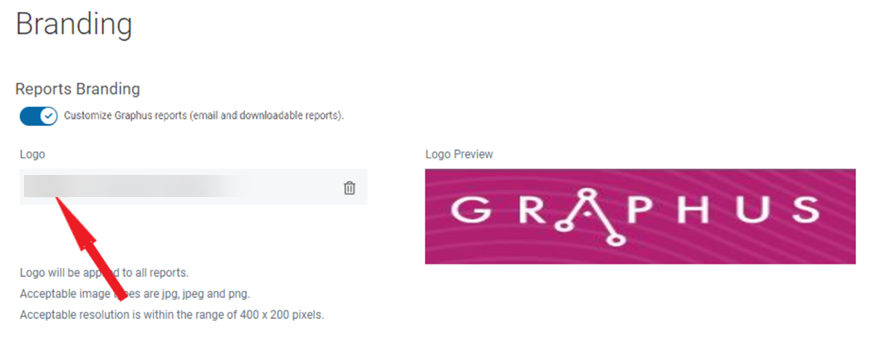
Header and Footer Color
Click inside the text box to display the color palette. Select a color by dragging the dot inside the square to a specific location. Also, you can drag the slider bar up or down to move between hues of different colors. Alternatively, you can manually enter the color code. When you click Done, the selected color’s code appears in the textbox.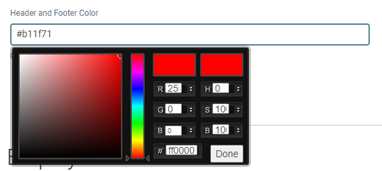
Previewing Reports
Previewing a report shows how the report will look to your customers when they receive it.
The Preview HTML Report button displays the report in HTML format.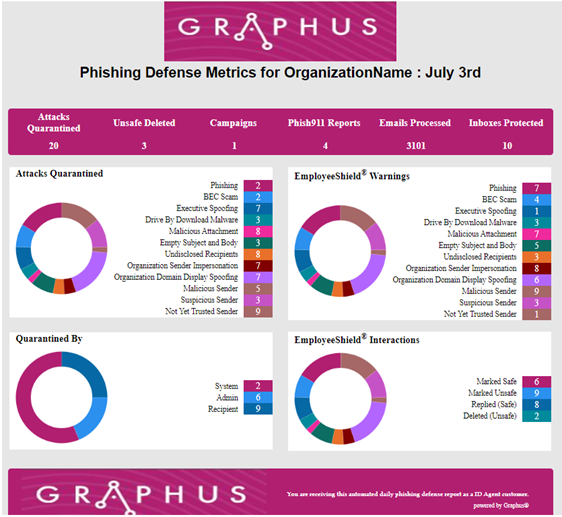
The Preview PDF Report button displays the report in PDF format. 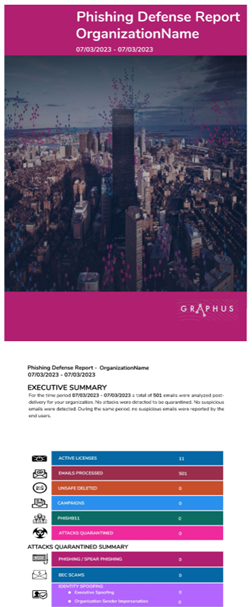
How to...
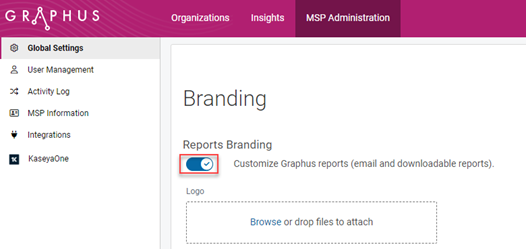
- On the top menu, click MSP Administration.
- In the Branding section, click the Reports Branding toggle to enable it.
- Add a logo to your reports by browsing to or dropping the desired file in the Logo field.
- Apply a color to the report header and footer using the color picker.
- Click the Preview HTML Report button or the Preview PDF Report button.

- Apply the branding selections to the desired organizations by clicking one of the following buttons:
- Save as Default
- Apply
- Save as Default And Apply
Enabling the EmployeeShield® Banner feature will display a warning banner at the top of any email that Graphus determines is suspicious but not malicious. The banner includes a message explaining why the email was flagged and can be interactive, allowing the recipient to mark the email as safe or unsafe.
In addition, you can customize the look and feel of the EmployeeShield® Banner.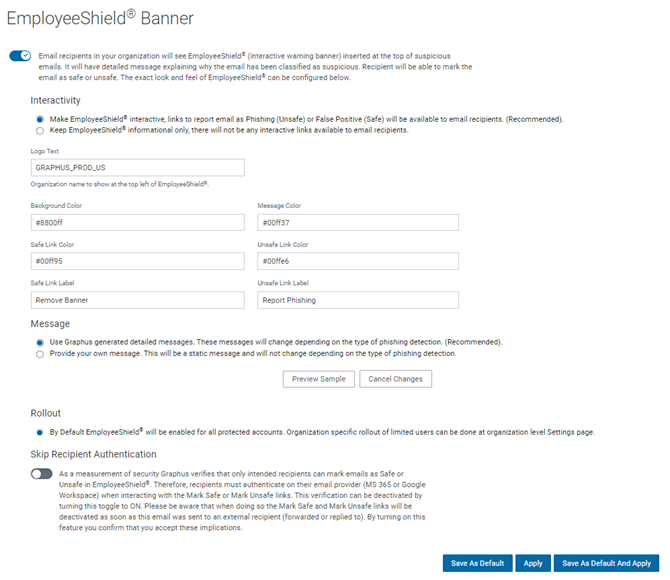
How to...
- Click the EmployeeShield® Banner toggle to enable it.
- In the Interactivity section, the interactive option is pre-selected, meaning the banner will include interactive links that allow recipients to report an email as either Phishing (Unsafe) or a False Positive (Safe). If you select Informational, the banner will display a message only and will not include interactive links.
-
You can customize the following banner elements:
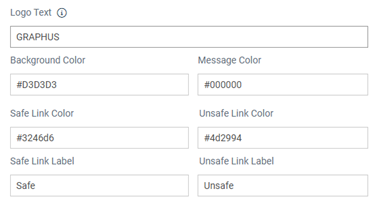
- Logo Text: This is the organization name that will appear in the upper-left corner of the EmployeeShield® Banner.
- Background Color: Click inside the box to display the color palette. Select a color and click Done.
Note: Perform the same steps to change the color of the other banner elements described below.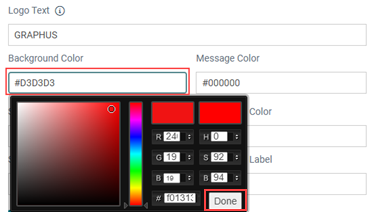
- Message Color: Select a color for your message text.
- Safe Link Color: Select the safe link color.
- Unsafe Link Color: Select the unsafe link color.
- Safe Link Label: Provide a custom label for the safe link. This is the link the recipient would click if they believe the email is a false positive.
- Unsafe Link Label: Provide a custom label for the unsafe link. This is the link the recipient would click to mark the email as a phishing attack.
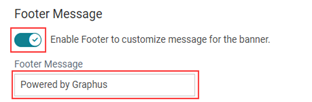
- If you want to include footer content within the banner, in the Footer Message section, click the Enable Footer... toggle. The phrase Powered by Graphus will appear automatically in the footer. If desired, you can provide your own custom content in the Footer Message field.
- In the Message section, Use Graphus generated detailed messages is selected by default. Therefore, the banner content will automatically update to describe the type of phishing that is detected. With the Provide your own message option, you can provide your own custom banner content in the text box that will be displayed. When this option is selected, the banner content is static (will not change based on the phishing type that is detected).

- Rollout: EmployeeShield is automatically enabled for all protected accounts.

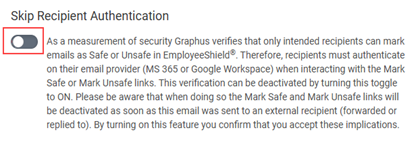
- With the Skip Recipient Authentication option, you can control whether recipients are required to authenticate to interact with the EmployeeShield® banner. By default, the option is disabled, meaning email recipients must authenticate on their email provider before being allowed to interact with the banner.
- Apply the EmployeeShield settings to the desired organizations by clicking one of the following buttons:
- Save as Default
- Apply
- Save as Default And Apply
Graphus will skip processing any inbound email with attributes that match the whitelisted parameters. No Quarantine or EmployeeShield® functionalities in Graphus will be applied to such emails. There are four different types of whitelisting capabilities provided on the platform:
- Whitelist Sender Domain: The "sender domain" is the domain name of email addresses. For example, xxxx.kaseya.com is the sender's email address, and kaseya.com is the sender's domain. This option will whitelist the sender domain and skip processing inbound emails whose sender email address has the configured domain.
- Whitelist SMTP Mail From Domain: Skip processing inbound emails whose SMTP Mail from the domain and the SPF value match the configured values.
- Whitelist IP Address: The IP address is where the email has been sent. Skip processing inbound emails whose SMTP Mail from the IP Address matches the configured values.
- SMTP Mail From and Sender Domain: You can whitelist a combination of the Sender Domain and SMTP Mail from the domain and SPF value. Meaning, this is a mechanism where specific emails that are coming from mail services like salesforces, email chains, or any authorized organizations can be whitelisted. This will reduce the scope of the SMTP mail from the whitelist and skip processing inbound emails whose sender email address has the configured domain and SMTP Mail from the domain.
For more information about whitelisting, see the article Graphus whitelisting options and best practices.
MSPs can configure whether EmployeeShield® is applied to emails from Suspicious and Not Yet Trusted senders. This is in addition to the Quarantine and several other types of EmployeeShield® that Graphus uses by default.
Turning this setting ON will apply EmployeeShield® on an email received from either a completely new external sender or a sender not yet trusted in the TrustGraph. Additional settings can be turned ON in this section to control this at a finer level by choosing the second and third options.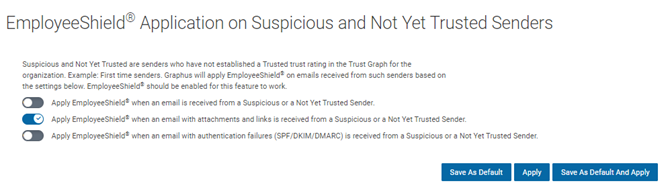
These settings can be turned on or off in three different ways:
- Apply EmployeeShield® when an email is received from a Suspicious or a Not Yet Trusted Sender: Graphus will apply EmployeeShield® on an email from such senders. If you enable this setting, the other two are covered by default.
- Apply EmployeeShield® when an email with attachments and links is received from a Suspicious or a Not Yet Trusted Sender: Graphus will apply EmployeeShield® only on an email with attachments and links received from such senders.
- Apply EmployeeShield® when an email with authentication failures (SPF/DKIM/DMARC) is received from a Suspicious or a Not Yet Trusted Sender: Graphus will apply EmployeeShield® only on an email with either SPF, DKIM, or DMARC authentication failures received from such senders.
NOTE Toggles two and three can be enabled at the same time.
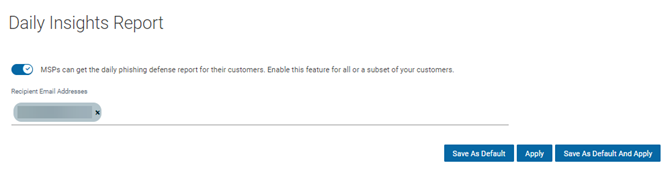
MSPs can get their customers' daily phishing defense report with Daily Insights Report. Enter the email addresses of the recipients for whom you would like to receive the reports.